SB107: How to Safely Acclimate Shrimp

Introduction

Proper acclimation is quite literally life or death for freshwater shrimp.  New shrimp keepers often think the process is like acclimating fish, where you simply dump a few cups of water in the bag over 30-60 minutes then release the fish.  Doing this would cause significant stress or the death of your new shrimp friends, and I doubt you want that.  Shrimp acclimation is not difficult to do but does require a little more time to ensure a healthy transition into their new home.  The rest of this guide takes you through the Shrimply Approved™ method of shrimp acclimation.  That starts by preparing your tank.

Step 1. Ensure your tank is ready

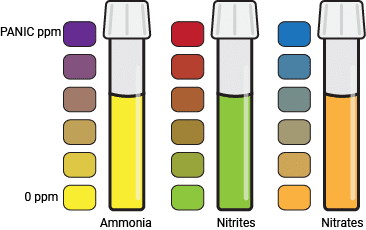
If you are putting your new shrimp into a freshly cycled tank, it is important to verify that it is actually cycled.  This means ammonia and nitrites consistently at 0 ppm and nitrates below 20 ppm for at least a few days, which generally won’t happen for 3-8 weeks after initial setup.  If cycling is not done properly, then ammonia levels may shoot up and kill your shrimp.  No one wants that.

2. Plan your day

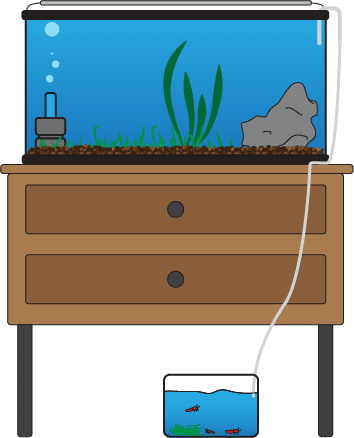
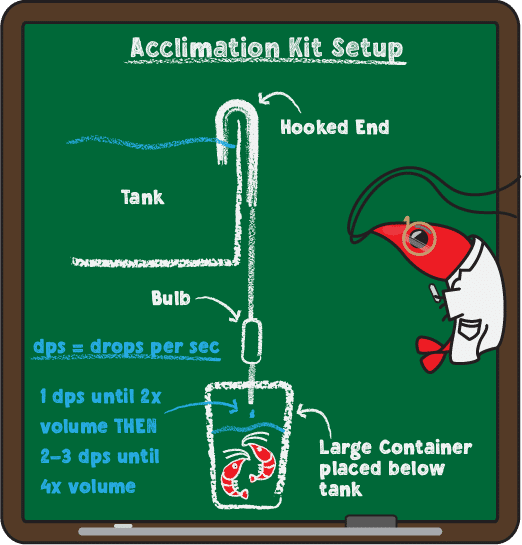
The acclimation process takes a few hours so it is important to be prepared.  That means having all the equipment necessary for proper drip acclimation along with 3-4 hours to pick up and acclimate the shrimp without being rushed.  This is not to say you can’t do anything else during that time, but it is recommended you check your acclimation setup every 30-60 mins to ensure water isn’t overflowing.

Depending on how you are buying your shrimp, the process may vary slightly:

Picking up shrimp in-stores: It is important to figure out how to make the trip from the store to your tank as stress-free as possible.  The key is to avoid:

  1. Significant temperature change
    • If buying them on a very cold or warm day, then the small amount of water in their bag may change temperature rapidly during your trip home. To avoid this, put the bag in a cooler, Styrofoam box, or other insulated package.  Adding ice or a heating pad may seem like a good idea, but they could cause excessive temperature changes as well so it is best to avoid using them.
  2. Excessive movement
    • Just as we do not enjoy earthquakes, your shrimp do not enjoy being sloshed around in the bag when coming home from the store.  Don’t be Darla!
    • To prevent excessive movement, bring a clean piece of cloth (something that doesn’t leach chemicals into the water) or moss with you to place in with the shrimp. This gives them something to hold onto and reduces their stress levels.  Also, avoid having too much air in the bag.  More air means more room for the water to move around.  If the trip home is less than an hour, then an inch or so of space at the top is all that is required to ensure they have enough oxygen.   Lastly, keep the bag somewhere that it won’t roll or shift during the journey home, whether that is in your lap (if you’re not driving) or in a container that won’t slide around. 

Ordering online: This is the easiest option that requires little planning, as most online sellers already take the precautions mentioned above to avoid stressing your shrimp.  All you need to do is be around for delivery so the package doesn’t sit outside and get too hot or cold, depending on where you live.  This concern can be avoided if the seller uses insulated packaging for shipping, which most do.   

Once your shrimp arrive safely, it is time to acclimate!

Step 3. The Drip Acclimation Process

The goal of the acclimation process is to get your shrimp comfortable with your tank water.  Shrimp are sensitive so fast changes in water conditions cause stress, lowering a shrimp’s ability to fight illnesses or killing them outright.  Dropping them directly from their bag into your tank would be like if you were teleported from a balmy spa into a snowstorm while still in your bathing suit—Shocking, to say the least. 

As such, equipment and instructions for safe acclimation are included below.

Equipment

  • Drip acclimation kit – For slowly introducing tank water into the water your shrimp are in.  Allows for a safe and stress-free transition into your tank.   Can be DIY or store-bought for around $10.
  • Fish net – After acclimation, it is always best to net shrimp out and place them into your tank instead of pouring them in with water from the store.  This reduces the chance of contaminating your tank with unwanted bacteria, snails, or plants. 
  • Large container – Must be able to hold at least 4 times the volume of water in the bag of shrimp.  Your fish (shrimp) net should also be able to fit inside to net your shrimp out at the end of the acclimation process.
  • Smaller container or glass – Must hold at least ½ cup (or 100 ml) of water.  

Instructions:

  1. Pour a small amount (1/2 cup or 100 ml) of water from the shrimp bag into your small container.
  2. Pour the rest of the water—with the shrimp—into the large container. It is best to swirl the bag slightly then dump quickly to avoid having shrimp stuck to the inside of the bag.
    • If any shrimp get stuck to the sides of the bag, then pour the water from the small container back into the bag to free the shrimp. After that, pour the poor shrimp into the large container. 
  3. Position both containers below the water level of the tank.
  4. Place the hooked end of the drip acclimation kit into your tank and the other end in the small container.
  5. Squeeze the bulb on the acclimation tubing to get tank water flowing. This may require multiple squeezes.
  6. Adjust the flow rate to roughly 1 drop per second. This is generally done with a wheel on the tube for store-bought kits.
  7. Place the tube into the large container with your shrimp.
  8. Place the large container in a dark place or cover with a cloth.
    • Less light means less stress for your shrimp.
  9. After the volume of water has doubled in the large container (roughly 1 hr), then adjust the flow rate to 2-3 drips per second.
  10. Take the drip system out once the volume is 4 times what it was initially – roughly 2-3 hours.
  11. Measure the temperature of your tank and the large container to verify they match (within 3-4°F or 1-2°C)
    • If temperature does not match, then place something warm or cold near the side of the container to slowly change the temperature. Keep a close eye on the thermometer to avoid cooking or freezing your shrimp.
  12. Net your shrimp out and place them into your tank!

Conclusion

Once completed, your new shrimp friends should be right at home in the tank, although they may take a few days to start getting adventurous.  Now you are an official shrimp keeper – Congratulations!

Proper acclimation is an important step toward raising happy and healthy shrimp but there's a lot more to learn.  Shrimply Explained is dedicated to helping you be successful in the hobby and we do that with tips, discounts, and news delivered to your email! 

If you want to learn more about shrimp, then check out The Shrimp School, or continue onto our next lesson SB 108: Differences Between Male and Female Shrimp

The Shrimply Explained Newsetter

Menu

Copyright © 2024 Shrimply Explained.  All Rights Reserved.
Get your shrimp fix with Shrimply Explained on social media!
Copyright © 2021 Shrimply Explained.  All Rights Reserved.
linkedin facebook pinterest youtube rss twitter instagram facebook-blank rss-blank linkedin-blank pinterest youtube twitter instagram