Shrimply Explained is currently undergoing renovations. Please don't buy anything yet. Thank you!
Water for shrimp is like air to humans. We are constantly surrounded by it and depend on healthy air for survival. If air gets polluted, then our lungs can collect harmful chemicals that cause irritation or cancer. It’s why smoking is really bad for you. Bad water quality is basically like giving your shrimp cigarettes. It might not kill them immediately, but will cause stress and reduce their overall health. You probably haven’t put cigarettes or any other pollutants into your tank intentionally but your shrimp might still feel like they’re living in a sewer.
This can be true even if your water parameters are all in range. Some common symptoms of bad water quality include:
In this article, we’re going to explain what water quality is, how it differs from water parameters we commonly test, and how to improve your tank’s water quality for healthier shrimp. Let’s get into it.
Other Shrimp Content
We have a lot of content coming soon. Please follow us on social media and subscribe to our newsletter for updates and useful shrimp care tips!
Water quality refers to the chemical, physical, and biological characteristics of the water.
Chemical characteristics include what we typically measure, like pH, GH, KH, ammonia, nitrites, and nitrates. It also includes other aspects we don’t typically measure like sulfates, phosphates, and dissolved oxygen.
Physical characteristics include things we can sense, like the smell, color, or temperature of your water. TDS also falls under this category.
Biological characteristics include visible and invisible aspects of organisms in your tank. For example, lots of algae indicates an imbalance of nutrients. There could also be a ton of single-celled bacteria and protists populating your tank due to excess detritus. Your shrimp’s behavior or coloration could also be an indicator of good or bad water quality.
Bad water quality refers to water that has a lot of excess nutrients, organic waste, bacteria, and other microorganisms in the water. This leads to unhealthy conditions that stress out our shrimp by clogging their gills, making them more susceptible to disease, or causing other problems. We may be able to detect some signs of bad water quality like floating particles, discoloration, an unpleasant smell, or strange animal behaviors, but that’s not always the case.
You and your shrimp deserve the best and Shrimply ExplainedTM is here to provide that. This lesson is part of our Shrimp Basics (SB) Series, which covers important information needed to raise healthy and happy shrimp. Check out SB101: Are Shrimp Right for You? if you want to start from the beginning.
Please reach out to us via social media or email for any help with your tank, feedback on our content, or just to talk about shrimp!
Sincerely,
Rick and Shrimply
Shrimply Explained™ is a participant in the Amazon Services LLC Associates Program, an affiliate advertising program designed to provide a means for sites to earn advertising fees by advertising and linking to Amazon.com.
Water parameters like pH, GH, and KH can give us a bit of information about the chemical composition of our water but don’t tell us whether anything toxic is present. Ammonia, nitrites, and nitrates can tell us about toxic nitrogenous compounds, but those are just three of many potentially harmful compounds that can build up. Ammonia, nitrite, and nitrate tests are certainly useful and the most common, but they don’t give us the whole picture.
For example, how much biological waste is floating around waiting to be broken down? How much oxygen is left in the water after debris is decomposed? What harmful bacteria did the recent substrate cleaning kick up?
Water quality refers to all the chemical, physical, and biological parameters we mention, along with other factors we can only measure with expensive equipment, such as dissolved oxygen, bacterial levels, heavy metals, and other pollutants. While most hobbyists may not have the tools to measure how good or bad our water quality is, there are some easy things we can do to help improve water for our shrimp. To do that, we first have to understand what causes bad water quality.
Water becomes unhealthy for one or more of the reasons listed below:
When one or more of these problems is present, the ecosystem can be thrown out of balance, resulting in excess ammonia and other nutrients building up, along with unhealthy levels of bacteria and other microorganisms in the water. This can result in a booming population of detritus worms and copepods. It can also cause bacterial infections in your shrimp or an overgrowth of vorticella or scutariella japonica. While these organisms are not typically harmful, bad water quality can increase their population to harmful levels. We intend to get a video out to explain more about the relationship between shrimp and scutariella so, if you want to learn more, then subscribe to stay up-to-date!
Now, let’s go a little more in-depth into each problem and how to fix them.
Organic matter from uneaten food, poop, or dead plants/animals can build up in and on top of your substrate as brownish mulm. This mulm supports a host of microorganisms that feed on it and, in doing so, break it down into more basic compounds like ammonia, nitrite, and nitrate. The release of these compounds is not a problem if your tank has enough beneficial bacteria and plants to keep them below harmful levels, but excess mulm can overwhelm your ecosystem. This is especially common if uneaten nutrient-dense food makes up the majority of the mulm, which is why taking out uneaten food after 2-3 hours is crucial to a healthy shrimp tank (Caveat, there are some foods intended to be left in for longer). If you’re not sure how much to feed, then a feeding dish is a great option to keep all the food in one place and remove any excess.
We want to be clear that mulm is a necessary step that can be great for an ecosystem. For example, in a healthy ecosystem, much of the mulm gets worked into the substrate by bottom-feeders so any released nutrients are trapped and accessible to plants. Any excess mulm gets pushed into the water and caught by the filter, where it can then be removed periodically. To do that, a tank needs water movement – otherwise the mulm just ends up sitting on top of your substrate and decomposing. This isn’t a problem in tanks where the inhabitants don’t come into contact with the mulm, but shrimp spend most of their time near the bottom of your tank. This means they may have to wade through mulm and may be exposed to harmful bacteria.
But at the same time, they’re bottom feeders that eat detritus. Why would wading through food be a problem?
Think about it this way – There’s a difference between stepping in dog poop and being submerged in it, right? One is annoying, the other is life-threatening.
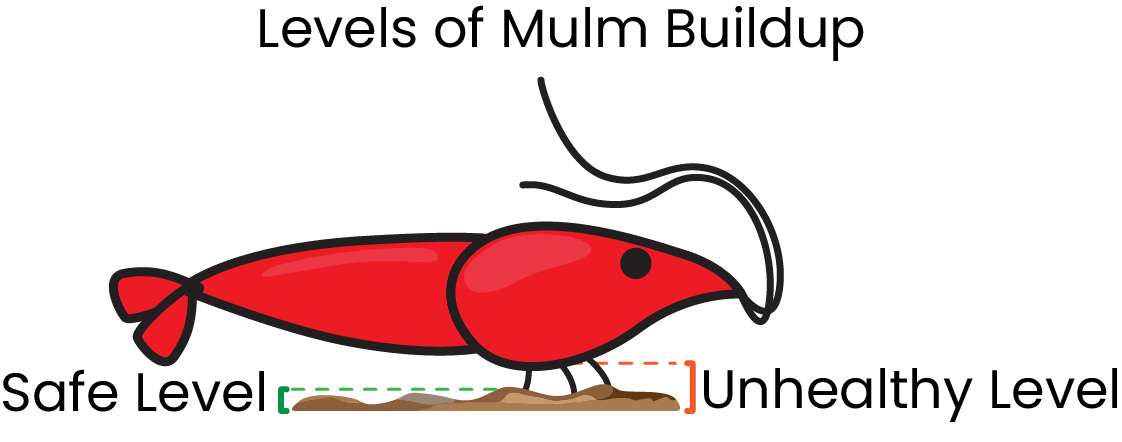
Shrimp feet and digestive system (mouths, stomach, etc.) are designed to be exposed to mulm and the bacteria in it. Their gills, eyes, and swimmerets? Not so much. Tall stacks of mulm expose bacteria and other microorganisms to vulnerable areas of your shrimp. If it gets in the wrong place, or if your shrimp’s immune system is weakened due to stress, then this can cause health issues like chitinolytic infections, parasites, milky shrimp disease, and other issues.
Again, some mulm is fine – even healthy because it can provide food for plants and shrimp – but too much is a problem. If you see areas where mulm is building up high enough to touch your shrimp’s shell, then it’s a good idea to remove some of it. That can be done by improving water flow with a better filter, aerating the tank with an air stone to increase the rate of decomposition, or adding animals that work mulm into the substrate (kuhli loaches, pygmy Corydoras, rabbit snails, etc.).
One other thing to note is that not all debris buildup is visible. Extra nutrients or heavy metals in the water column can become concentrated due to a lack of maintenance or the use of tap water for topping off the tank. One way to know how much invisible debris is present is to use a TDS meter, which measures Total Dissolved Solids (TDS) in your water. This includes GH, KH, nitrates, sulfates, heavy metals, and just about every other compound floating around your tank. If your TDS is high, then it suggests there's a lot of unnecessary compounds in your water, some of which may be detrimental to your shrimp's health.
What is high TDS though?
Well, that depends to some degree on your source water. If you're using RO/DI water and remineralizing with only the exact minerals shrimp need, then TDS may be anywhere from 80-250 mg/L, depending on what shrimp you're keeping. These remineralizers add the exact GH and KH you want, both of which are equivalent to 17.9 mg/L of TDS per degree hardness (dH). You may use our GH/KH Calculator to convert the values in your tank. For reference, ppm and mg/L are interchangeable units.
If your TDS is significantly higher than the combined mg/L of your GH and KH, then there are a lot of additional compounds in the water. This is very common for tap water and well water as they often contain extra sodium, phosphates, and chlorine, although it isn't necessarily a problem for your shrimp's health. Because of this, TDS is more of a reference point when using tap water since you don't know exactly what is in it, but you can compare your tap water to your tank water. If your tank water is much higher, then it suggests there is a buildup of compounds that may be removed via water changes.
A drawback of TDS is that it isn't always the most reliable. TDS can change drastically if you just added fertilizer, or if you just disturbed the substrate, or if the TDS meter is dirty, and the cheaper TDS meters most hobbyists have aren't terribly accurate. If you know about these weaknesses though, then a TDS meter like this one is still a useful tool we recommend for shrimp keepers, especially if you're remineralizing RO/DI water.
When the substrate is disturbed by moving plants or gravel vacuuming (rarely necessary in shrimp tanks if mulm is under control), then it can kick up tons of microorganisms and debris into the water. The organisms in your substrate can be extremely beneficial to your tank, but only when they are left out of the water column. If they get kicked into the water, then we get the same problems seen with large piles of debris buildup, namely infections and excess nutrients in the water column, leading to stress on your shrimp. This doesn’t mean you can’t gravel vac or move your plants, but you should consider a few things when doing so.
First, if you decide to gravel vacuum, try only sucking up the top layer of mulm without pushing the vacuum deep into the substrate. This prevents the lower layers of the substrate from being disturbed and reduces the amount of debris that gets thrown into the water.
As a caveat, there are people who regularly gravel vacuum without a problem, but this is because they have good technique that lets them catch most of the debris. They also gravel vacuum frequently (weekly) so debris and bacteria don’t establish in the substrate. This frequent substrate cleaning is mainly done in aquariums without aquasoil and with a lot of fish poop, whereas shrimp tanks normally don’t need to be vacuumed regularly if they are fed the proper amount.
The second thing to consider before and after disturbing the substrate is whether your filter is clean. If the filter isn’t running at peak performance before the substrate disturbance, then debris and microorganisms will stay in the water column for much longer, leaving your shrimp exposed to stressors. In addition, even if your filter is running well before the substrate disturbance, will it get clogged over the next few hours before the water is completely clear again?
All this is to say that it’s a good idea to maintain your filter and pay especially close attention to how well it’s working before and immediately after gravel vacuuming or aquascaping so any debris gets removed quickly from the water.
Dissolved oxygen (DO) is critical to a healthy ecosystem because so many organisms need it to survive. The obvious examples are your shrimp, snails, and fish, but there are others we may not think of. Other organisms that need oxygen include those responsible for decomposition, as they use up oxygen when breaking down waste in your tank. If there’s not enough oxygen, then waste builds up and creates unhealthy water quality for shrimp. Even if there is oxygen, these bacteria may deplete it if excess food, a high bioload, or a dirty filter requires a lot of decomposition.
When oxygen levels drop, shrimp experience a similar experience to humans exposed to the same conditions – they tire easily, may act erratically, and could change or lose their color (yes, humans can do that too). In addition, it has been shown that low DO levels have a significant impact on shrimp immune systems, leaving them vulnerable to diseases.
If you have an appropriately sized sponge filter bubbling away, then dissolved oxygen typically isn’t a big problem. If, however, you have a sponge filter, hang-on-back filter, or canister filter that is dirty or does not agitate the water significantly, then low DO could be a concern. In these cases, an air stone, maintenance, or a new filter should be considered to see if there is any improvement in shrimp health.
As we’ve mentioned in previous sections, a poorly-maintained filter won’t provide water flow or effective filtration to your tank. This leads to debris build-up and nutrient build-up in the water column, which can expose your shrimp to stressful water conditions and/or harmful microorganisms. Poor filtration also reduces the rate that oxygen gets replenished and distributed throughout your ecosystem.
If you haven’t cleaned your filter in a while, then it never hurts to give it a quick rinse as long as it isn’t exposed to too much chlorine, heat, or left out to dry. An underpowered filter is rarely a concern, except for ones that come with cheap all-in-one aquarium kits. If you’re concerned about a weak filter at all though, then double-check you got the one that’s the right size for your tank and that it is adjusted to the right flow, or buy a new one to cycle and replace your old one with and see if that fixes your problem.
If your ecosystem can’t handle the amount of food and waste being added, then you’ll likely see ammonia, nitrite, or nitrate spikes. There may also be debris buildup in the water column or on the substrate, creating an unhealthy environment for your shrimp. This isn’t too common in shrimp-only tanks or shrimp+snail tanks if any excess food is taken out within 2-3 hours, but it can still happen if there are too many shrimp or snails and not enough maintenance being done to prevent waste build-up. If you are concerned about a high bioload, then more frequent filter maintenance and water changes, along with less feeding, should be done to reduce the amount of nutrients entering the system – at least until some of the animals get rehomed.
While you should focus on solving the long-term problem of what imbalance in equipment or nutrients is causing bad water quality, an immediate but temporary solution is to do a hydrogen peroxide (H2O2) treatment. H2O2 quickly kills exposed microorganisms floating in the water column without causing significant harm to beneficial bacteria on surfaces protected by biofilm – at least if you follow the procedure properly. It can also remove or kill organisms like Scutariella japonica, hydra, and vorticella. This is something we first heard of from Mark over at Mark’s Shrimp Tank so we recommend going over to watch his whole video here and showing some support with a like and subscribe!
If you don’t have time to watch the video, then here’s the treatment protocol:
Again, this treatment is not a cure-all for water quality issues. You will still need to figure out what caused the problem to prevent future issues.
Bad water quality is possible, even when parameters are in the right range. While that makes the water quality difficult to assess quantitatively, understanding the common causes covered in this article should help you assess your own tank for potential problems with setup, maintenance, and feeding so you can prevent seemingly random deaths and keep a healthier shrimp tank.
If you have any questions or things you’d like to add, we’d love to hear about them! You’re always welcome to reach out to us on social media or via email. If you’re new to shrimp, then we highly recommend perusing The Shrimp School from Shrimply Explained to learn more about key aspects of shrimp keeping.
Good luck and happy shrimpin’!
